Stick Pin Swap at MAS

Sunday, July 28, 2013

Well it's Sunday and I'm exhausted, it's been a busy week. Spent most of the weekend with my husband and two of his sisters. Dinner with the family and us girls had a baby shower for a friend of our yesterday. Now it's back to crafting.

I am a member of the fine group over at Mini Album Scraps. I'm really glad that I joined the group. It's made me more accountable in my crafting and I think a bit more creative and for me, these really are challenges. I think because presentation is a very important part of the swap and that really needs to be as good as what you are swapping.
Now, I'm also cook, and I know that presentation is a huge part of serving food and I put a lot of thought into it and it just come second nature to me most days. But in the crafting world...well let's just say this really is more of a challenge for me.


The last swap that I joined was the June Stick Pin Swap which had a beach theme and I jumped in with both feet. I wasn't as happy with my presentation piece as I would have liked. I had an idea but I don't think I executed it as well as I can.  The worst part about the whole this is that once you start making these you don't want to give them away. They are all so pretty.


Requirements for the pins were that there needed to be 4 pins per presentation piece and we were swapping three. Beach was our theme so we needed to stick with colors found around the beach be they sea glass, shells, drift wood etc and at least one pin had to have a dangle. The hardest part for me was finding anything that resembled a decent seashell.

I think I did pretty well.
What do you think for my first stick pin swap? Did I pull it off?
I'm looking forward to getting my swapped pins back and I'm currently working on my next stick pin swap which includes a pin cushion as a presentation piece.
Tell me what you think.

June Cards

Sunday, July 21, 2013

Can you believe that July is already half over? The summer is zooming by fast and has been really busy. I've had baby showers, weddings, father's day and birthdays galore. I didn't make as many cards as I would have liked but I did manage to get two done and out the door. The first one was a card for Father's day for my FIL.
I hate to say it but I was less than creative on the card. I totally loved everything about a card I found over at Paperwishes so ordered everything to copy the card. The great steampunk paper, the vintage cars Dazzles the smooch inks and I lifted the design and made a copy. It turned out great and the act of putting it together sprouted a few ideas for the future.


I love Dazzles and have a three ring binder full of them and often forget that. If I'm lucking during a creative brainstorming process I'll  remember and be able to pull out some sheet that ends up being just the perfect thing for what I'm working on.


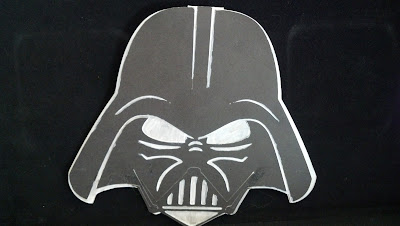
The next card I did was for my husbands birthday. We are both huge Star Wars fans and I couldn't let an opportunity to cut Darth Vader on my Silhouette Cameo go by. (Honey's a huge fan of the Empire.)
It was simple but the result was an ecstatic husband and that's what counts. Especially since the poor guys had his birthday sandwiched between a baby shower and and a wedding and his birthday presents have still not arrived. (My bad)  Anyhooo. I used card stock from Close to My Heart. I love how smooth it is and how wonderful it is to work with. Simple  black layers on the cuts and where the white (Colonial White to be exact) was showing I used Silver Smooch ink. It looks really nice and like I said he was tickled.

Butter Cream and Burlap

Wednesday, July 17, 2013

I've mentioned that my girlfriend got married last month, it's been a whole two weeks so far. Married during one of the most awesome heatwaves Northern California has seen in a while and of course it was outside. I've had several requests for me to post pictures of the cake and the burlap roses I did for her. So here they are.

First the cake. Since the bride wanted butter cream instead of fondant on her cake I hit Pinterest for inspiration and found this. It was perfect. So. Thinking I'd give it a shot I found the most awesome tutorial for doing the petal technique here. I haven't made a wedding cake in a while and well, I was happy with the cake. I'm just really glad no on could see my inspiration photo to do a comparison.  I was really starting to worry about the butter cream melting off the cake with the heat and I kept having to refrigerate the butter cream while I was working to continue decorating.  I can say that I am totally looking forward to doing this technique again on a couple of practice cakes. It totally looks elegant and it's simple and I have to say even a bit relaxing to do. (if you're not concerned about the butter cream melting.)
The back side of the cake. 
Next are the flowers. I wish I had a good picture of the centerpieces that were used on the tables. They were simple mason jars wrapped with burlap and ribbon with a button embellsiment on the front filled with small cheery sunflowrs and daisies. Each of the bouquets had one of these burlap flowers stuck in the jars. I found the best tutorial for burlap flowers here. I used burlap ribbon instead of a piece of burlap of material even though I had a whole bolt hanging around the house. The yellow ribbon I found at Joann's and it was wired. The regular burlap ribbon is from Close to My Heart and that can be purchased at my CTMH store here. I love this stuff, the finished edges really made the roses look polished and they couldnt be easier to make. Just watch the hot glue. Burlap being a very loosely woven material tends to allow the hot glue to seep through layers and hot glue is, well,  just plain HOT. Watch out for your fingers is all I can say.


Let me know what you think. Are any of you out there DIY - aholics like I am?

Addition to the Craft Room

Sunday, July 14, 2013

So a few of you know that my husband and I are in the middle of a major remodel on our very old house. We have one of the few in ground basements in Northern California per our building inspector and we have completely overhauled it and made it basically into a 722 sq ft apartment and that's where we are living. When we finish the main living area  and move UP it will be a spare bedroom, my craft room and possible a man cave/second spare room, and I will have two kitchens!!!!


But until recently the Craft Room/Dining Room/Office looked like this, and this is just one side of it.


The messy, unorganized right side of the room. Look at that poor used of space.

The red chair was my Darling Husband's "gaming chair." He picked it up along with a sofa, love seat and ottoman a couple years back for a hundred bucks when he broke his leg. But I digress. He decided that if I had more storage it might look less cluttered because I'd have someplace besides the table to put things. He also said the chair was hard to get in and out of and if we put counter with a work station spot in he could set his computer game stuff there. If I didnt mind. (Of course not, lol)
Table on the "other" side of the room.

So we picked out a counter and cabinet from our local Home Depot.
Of course I had to DIY the cabinet before it could come downstairs.


I chalk painted and stenciled the cabinets, using Royal Design Studio's Lovely Lace Furniture Stencil and Behr paints that I made into chalk paint after reading Diane's post on how to do so here. The particular piece above my honey fitted with casters so it rolls out and it cleverly hides our storage cupboard under the stairs.
I love the teal it goes well with the sunny yellow in our downstairs and it goes well with "cat" also. Here's my helper Ace he really felt like he needed to be a part of the project. Thank goodness the paint dries fast and being the end of May when I was working on this it was rather warm.
Here's the grand reveal after the install.

I still would like to put hardware on the drawers and  doors but we havent picked those out yet. I aslo need to take a few minutes and rub the piece down with wax to finish the process to protect my investment. But for now I'm really loving this, it's got a great place for my Scrap Rack over in the far corner and my honey says he's happier at his new gaming spot.

My First TP Roll Mini Album

Thursday, July 11, 2013

I've been busy, busy like a crafting fool. Hopefully I can get posts in to show what I have been doing.

Lets start with the latest thing and work my way backwards. I decided to join a couple of groups with hopes of meeting some talented crafty people, making some new friends and learning some things and actually producing something. First place I joined was Mini Album Scraps (MAS), I figured if it was about mini albums I might actually do something with all that crafting goodness I've been stashing away in in my craft room. Now don't get me wrong, I think scrapbooks are nice but heck, I have a major creators block when it comes to doing a layout. They are NOT my forte. But mini albums...they are beautiful, creative pieces of art. Ok, so are large layouts,  but they seem easier, more manageable, something I can actually wrap my head around. And I don't necessarily have to put pictures in at the time I'm doing them. That makes my life infinitely easier if I'm not trying to shove photos into my creativity.

So I'm looking through the swaps available and I see "Toilet Paper Roll Mini Swap" and my head starts spinning. I have been saving tp rolls for quite a while, for what exactly I'm not sure but I knew I might use them for something. Quilling a home decor something maybe, but I had them nonetheless. I was in, and I'm done. and I really hope it manages to meet expectations.
I learned several things. First of all, apparently I love to make embellishments, and if you are doing something like this it's a good idea to have your embellishments completed and together before you start. Also, have more then you think you are going to need. Maybe you can tell from the picture, but my album is a bit on the chunky side. I don't think "flat" is in my repertoire. Below are some of the pages that were in my mini. All of the paper used to cover the tp rolls were from the  Close to My Heart "La Belle Vie " paper pack. The same paper pack was used to make the majority of the embellishments. All the ribbon fibers I've had in my stash but the black and mauve lace and  velvet ribbon used along with my bling I picked up at Michael's a few weeks back in the dollar bins. They were perfect!


I'm really happy with the way it turned out overall but I know where my improvements will be on the next one and I have tp rolls being flattened as we speak!!! Also, I think one of the requirements of the MAS group is to video and upload to YouTube when we get our swaps. I need to check, if thats the case I'll be adding some video.
Let me know what you guys think.